How to disassemble the junction box
How to Disassemble the Junction Box
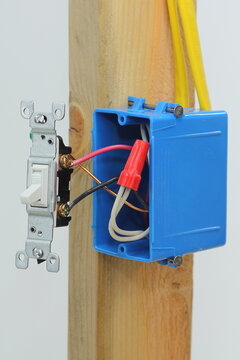
Junction boxes are an important part of any electrical system. They keep wires separated and help protect circuits from damage or fire.
They are available in metal or plastic. They are used for both indoor and outdoor installations.
Turn Off the Power
Taking the time to learn how to turn off the power before you begin working on any circuit in your home is the safest way to save yourself from potential injuries. This process is especially important for older homes with multiple circuits or a large number of devices that require power.
First, locate the main breaker on your electric meter. Usually attached to the line right before it enters your house, this is the centralized point of distribution for all of your household circuits.
Once you've found it, switch the breaker to the off position. This is an unnecessary step, but one that will help prevent you from accidentally turning the power back on while you're trying to work.
Next, test the wires in the box with a noncontact voltage sensor. You should see a light flash and the sensor's alarm should sound.
A noncontact sensor can also alert you to any other electrical anomalies, such as the presence of a grounding wire or bar. These malleble box are important safety precautions you can't afford to skimp on.
To complete the disassembling of your junction box, you'll need to remove the screws that hold it to the wall or ceiling studs. Depending on the model of your unit, you may need to unscrew several of these screws to get the job done.
In addition to the aforementioned screws, you'll also need to unsnap a few of the metal clamp connectors that secure the wires inside the box. These are small, circular pieces that attach to the wires and the box. To unsnap them, you'll need a flat-head screwdriver.
Determine the Location of the Stud
There are several ways to determine the location of a stud, including using an electronic device called a stud finder. These tools use sensors to scan the density of drywall and other finished wall surfaces, and they will then indicate the location of a stud on the surface.
A stud is the framing member behind drywall on interior walls and wood sheathing on exterior walls. Its presence provides a solid base for hanging things such as shelves, bathroom mirrors and flat-screen TVs.
The standard distance between studs is 16 inches. If you measure this in either direction from the corner of a room, you will probably find one.
You can also try locating a stud by looking for small holes in the drywall, called dimples, where screws have been fastened into the drywall. These are often drilled through the drywall near the baseboard.
Another way to locate a stud is to look for light switches and electrical outlets that are mounted to the side of a stud. You may be able to locate these by examining the surface of the drywall, but it is less reliable than using a stud finder.
Alternatively, you can hold a flashlight parallel to the wall and see if you can spot where two pieces of drywall meet. That intersection is usually where you'll find a stud, but there are times when the drywall overlaps where the stud is.
Regardless of which technique you use, it is essential to confirm your findings before drilling any holes in the wall. This is because walls contain wiring, plumbing and gas lines that can be dangerous if hit by a drill bit.

Pry the Box Away from the Stud
Using a screwdriver, pliers, or small pry bar, lever the box away from the stud. If you can't push the box far enough, you can use a hacksaw to cut the nails that hold it to the stud.
Usually, wall boxes for switches and outlets are nailed to a vertical stud at the time the house is built. However, there are some exceptions to this rule.
If the stud is not visible in the drywall, use a stud finder to determine which side the stud is on. This terminal box will help you determine the direction of the box's mounting screws.
Next, determine which type of box you have. Round boxes have a screw in the center of the back, while square ones have two screws on opposite corners.
Once you know which type of box, pry the box from the stud slightly away from the stud. This will allow you to slide the blade of a mini hacksaw into the gap between the stud and the box.
Then, cut the nails that secure it to the stud with your mini-hacksaw. Generally, there should be one nail at the top and one at the bottom.
To get a faster job done, consider using a reciprocating saw equipped with a metal-cutting blade. This will cut through all of the nails that are holding the box to the stud in a matter of seconds.
Before attempting any work on a junction box, be sure to disconnect the wires and ensure they are not live. This will prevent an electrocution if you should accidentally hit the electrical cable with your tools. It will also help you avoid damaging the drywall.
Cut the Nails
A nailed junction box can be a pain to remove. If you're not up for a long drawn out project, there are tools and techniques that will let you get the job done quickly and painlessly.
To start, turn off the power that supplies electricity to the junction box. This will prevent any potential fire hazards as you disassemble it.
Next, use a flathead screwdriver or pliers to pry the junction box slightly away from the stud. This will create a gap large enough to insert the mini hacksaw.
You'll probably have to do this twice if you want to be sure to cut the nails that hold the box to the stud without any hiccups. The mini-hacksaw will be your best friend when you're ready to remove the box and all of its wiring components. Alternatively, you can purchase a pre-assembled kit that includes everything you need to perform the task.
Remove the Box
Junction boxes are designed to protect electrical wires from the weather and prevent sparks that can ignite flammable materials. They can be mounted to a wall or ceiling, or they may be buried in plaster. Regardless of the type of box you have, it's important to disassemble it before replacing it.
The first step in removing a junction box is to turn off the power to the circuit that sends electricity to it. This intersection box will keep you from accidentally getting electrocuted while working on it.
Next, determine the location of the stud that the box is nailed to and use a screwdriver or pliers to pry it away from the stud. This will allow you to slide a hacksaw blade between the box and the stud to cut the nails that hold it in place.
Once the box is free of the stud, you can remove it from the wall. Depending on the type of box you have, this might require a small hole in the wall or the removal of drywall from the area.
Before removing the box, it is necessary to mark each connection on the wires so that you can connect them correctly when installing the new junction box. To do this, tear off two pieces of masking tape and write each connection's number on them.
Then, release the wires from their connectors inside the box. You can do this by removing a single-screw clamp from the top of a metal box or by breaking a plastic tab holding the wires inside a plastic box. In either case, turn the screws that secure the connectors to the box counterclockwise with a screwdriver and carefully pull the wires from the connectors.


Comments
Post a Comment